Data Transfer Objects
Data Transfer Objects (DTO)
Section titled “Data Transfer Objects (DTO)”Data transfer objects - as the name implies - are objects that are used to transfer data.
Very often this means sending data over a network boundary - for example via a REST-API.
Data transfer objects solely hold data values. While classes or records that are used to implement DTOs can have additional functionality as methods, the main purpose is to (de-)serialize the data fields of DTOs so they can be transfered to its destination.
Usually DTOs don’t offer functionality that goes beyond storage, retrieval and (de-)serialization of their own data.
Implementation
Section titled “Implementation”Commonly DTOs are implemented as simple classes with only properties (POCOs) or as record types.
public class Person { public string Name { get; set; }}// orpublic record Person(string Name);DTOs for REST API Design
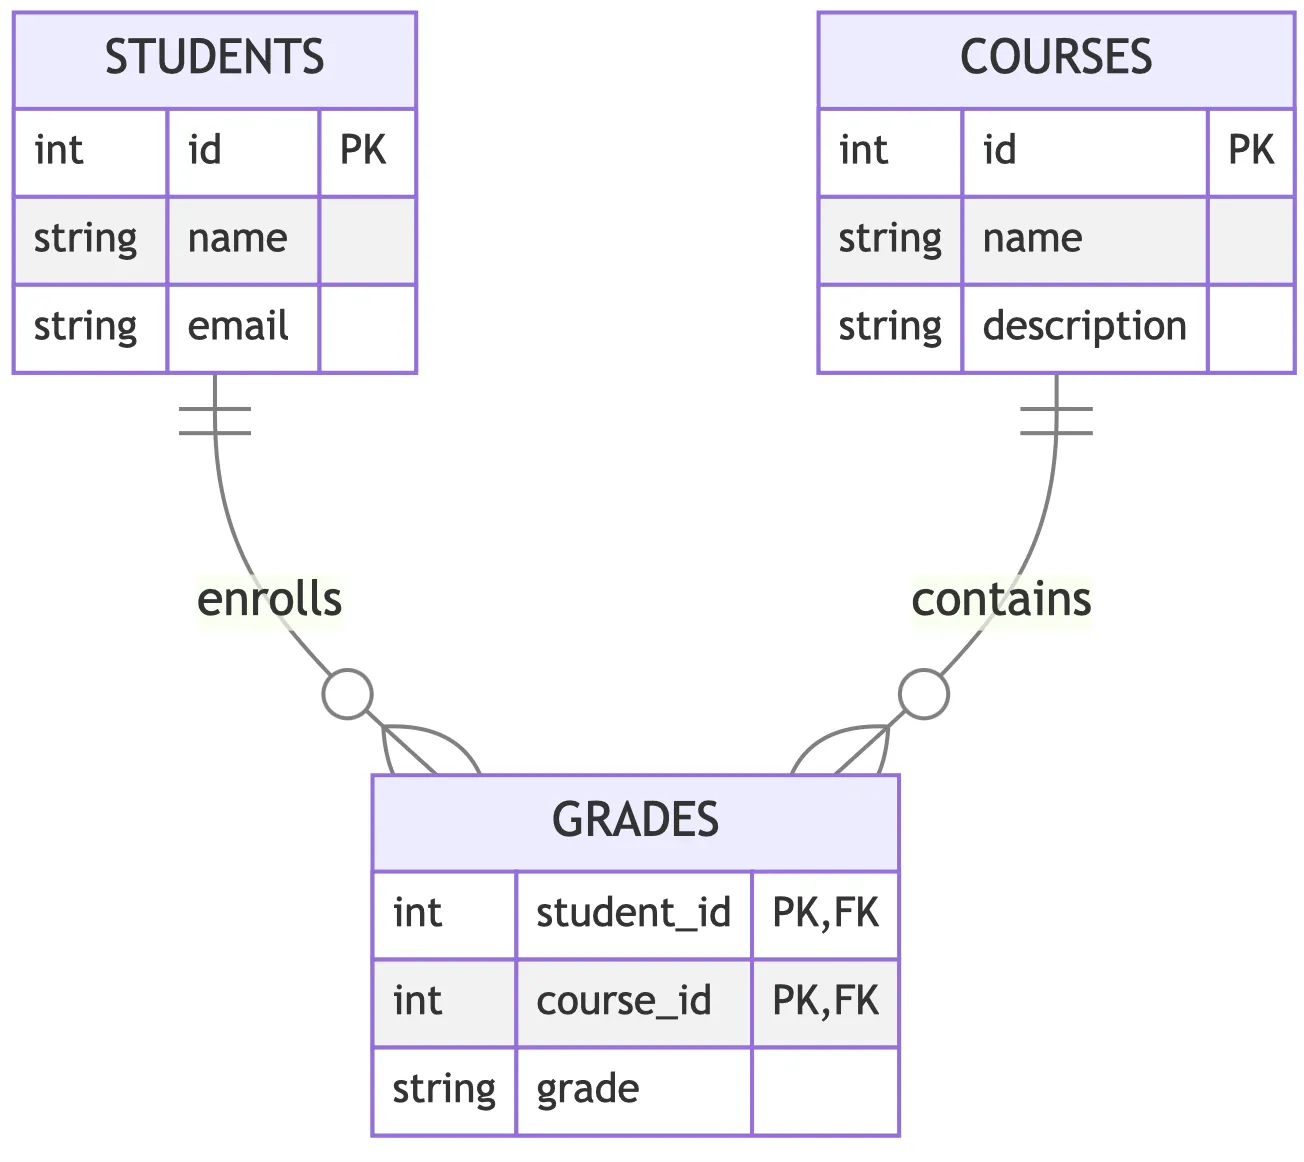
Section titled “DTOs for REST API Design”DTOs can be very useful when designing REST APIs. Consider this data model:
Entities in APIs
Section titled “Entities in APIs”When using entities (for accessing and storing data) you might and up with something like this:
public class Student {  [Key]  public int Id { get; set; }  public string Name { get; set; }  public string Email { get; set; }
  // Navigation Property  public Collection<Grade> Grades { get; set; } = [];}
When using the entity above in your REST API you might end up with a POST Endpoint that would require you to send data in this form when adding a new student:
{ "id": 1, "name": "Hugo", "email": "hugo@provider.com", "grades": []}This raises at least 2 questions:
- Why do I need to specify an ID for the student? Shouldn’t the server take care of that?
- Why do I need to specify a list of grades for that student when I just want to add a student without any grades yet.
Creating DTOs for different endpoints
Section titled “Creating DTOs for different endpoints”When designing DTOs for an API, it’s common to create different DTOs for different endpoints.
This allows your API to define exactly which data should be sent and received — instead of exposing your entire entity model.
Let’s use the Student entity as an example.
DTO for Creating a New Student
Section titled “DTO for Creating a New Student”When creating a new student, the client should only provide the necessary information.
In our case, that might just be the student’s name and email.
public class CreateStudentDto { public string Name { get; set; } = string.Empty; public string Email { get; set; } = string.Empty;}This DTO excludes Id and Grades because:
- The ID will be generated by the server.
- The Grades can be added later using a different endpoint.
A corresponding endpoint might look like this:
[HttpPost]public async Task<IActionResult> CreateStudent([FromBody] CreateStudentDto dto){  var student = new Student  {    Name = dto.Name,    Email = dto.Email  };
  _context.Students.Add(student);  await _context.SaveChangesAsync();
  return CreatedAtAction(nameof(GetStudent), new { id = student.Id }, student);}
DTO for Returning Student Details
Section titled “DTO for Returning Student Details”When retrieving student data (e.g., through GET /students/{id}), we may want to include some more details — but still not the entire entity graph.
public class StudentDetailsDto{  public int Id { get; set; }  public string Name { get; set; } = string.Empty;  public string Email { get; set; } = string.Empty;  public List<GradeDto> Grades { get; set; } = [];}
public class GradeDto{  public string Subject { get; set; } = string.Empty;  public int Score { get; set; }}
Example usage:
[HttpGet("{id}")]public async Task<ActionResult<StudentDetailsDto>> GetStudent(int id){  var student = await _context.Students    .Include(s => s.Grades)    .FirstOrDefaultAsync(s => s.Id == id);
  if (student == null)    return NotFound();
  var dto = new StudentDetailsDto  {    Id = student.Id,    Name = student.Name,    Email = student.Email,    Grades = student.Grades      .Select(g => new GradeDto { Subject = g.Subject, Score = g.Score })      .ToList()  };
  return Ok(dto);}
Here, the StudentDetailsDto clearly defines what the client will get, and the GradeDto ensures that grade details are shaped exactly as required by the API consumer.
Mapping DTOs
Section titled “Mapping DTOs”Manually creating DTOs can quickly become repetitive, especially if there are many properties.
This is where mapping comes in — a way to convert between entities and DTOs more cleanly.
Using a Mapping Library
Section titled “Using a Mapping Library”One of the most popular libraries for mapping in C# is AutoMapper.
It allows you to define mapping rules once and then use them throughout your codebase.
Install the package:
dotnet add package AutoMapper.Extensions.Microsoft.DependencyInjectionCreate a mapping profile:
using AutoMapper;
public class MappingProfile : Profile{  public MappingProfile()  {    CreateMap<Student, StudentDetailsDto>();    CreateMap<Grade, GradeDto>();    CreateMap<CreateStudentDto, Student>();  }}
Register AutoMapper in your Program.cs:
builder.Services.AddAutoMapper(typeof(Program));Use it in your controller:
private readonly IMapper _mapper;
public StudentsController(IMapper mapper, ApplicationDbContext context){  _mapper = mapper;  _context = context;}
[HttpGet("{id}")]public async Task<ActionResult<StudentDetailsDto>> GetStudent(int id){  var student = await _context.Students    .Include(s => s.Grades)    .FirstOrDefaultAsync(s => s.Id == id);
  if (student == null)    return NotFound();
  var dto = _mapper.Map<StudentDetailsDto>(student);  return Ok(dto);}
This approach drastically reduces boilerplate code and keeps your controller lean.
Implementing Your Own Mapping
Section titled “Implementing Your Own Mapping”While libraries like AutoMapper are convenient, they can sometimes:
- Hide complexity behind magic,
- Make debugging harder,
- Be less explicit about mapping logic.
An alternative is to implement your own mapping layer.
public class StudentMapper{  public Student ToEntity(CreateStudentDto dto)  {    return new Student    {      Name = dto.Name,      Email = dto.Email    };  }
  public StudentDetailsDto ToDto(Student entity)  {    return new StudentDetailsDto    {      Id = entity.Id,      Name = entity.Name,      Email = entity.Email,      Grades = entity.Grades        .Select(g => new GradeDto        {          Subject = g.Subject,          Score = g.Score        })        .ToList()    };  }}
Usage in a controller:
private readonly StudentMapper _mapper;private readonly ApplicationDbContext _context;
public StudentsController(StudentMapper mapper, ApplicationDbContext context){  _mapper = mapper;  _context = context;}
[HttpPost]public async Task<IActionResult> CreateStudent([FromBody] CreateStudentDto dto){  var student = _mapper.ToEntity(dto);  _context.Students.Add(student);  await _context.SaveChangesAsync();
  return CreatedAtAction(nameof(GetStudent), new { id = student.Id }, _mapper.ToDto(student));}
Why Manual Mapping Can Be a Better Choice
Section titled “Why Manual Mapping Can Be a Better Choice”While mapping libraries offer fast setup, own mappers offer more control:
| AutoMapper / Libraries | Own Mapper |
|---|---|
| Quick to set up | Requires some manual code |
| Less explicit mapping logic | Very explicit mapping logic |
| May hide complexity | Easier to debug and maintain |
| Good for large models | Excellent for well-defined domain layers |
| Relies on external dependency | No external dependencies |
| Own mappers shine in complex domains where explicit transformation logic is needed — for example, if mapping involves: |
- Aggregating values,
- Calling other services,
- Applying business rules.
Mapping with Facet
Section titled “Mapping with Facet”While AutoMapper is widely used, some developers prefer more explicit, compile-time-safe mapping solutions.
This is where Facet — a modern object mapping library for .NET — comes into play.
Facet uses source generators to produce efficient mapping code at build time, so you get:
- Strongly typed, compile-time checked mappings,
- Zero runtime reflection overhead,
- Simple and clean syntax.
🧰 Installation
Section titled “🧰 Installation”Install the NuGet package:
dotnet add package Facet
✍️ Defining Mappings
Section titled “✍️ Defining Mappings”Unlike AutoMapper, you don’t configure mappings at runtime.
You define them with attributes and let the source generator handle the rest.
For example, let’s map between Student and StudentDetailsDto:
using Facet;
[MapTo(typeof(StudentDetailsDto))]public partial class Student{    // Entity definition already here}
Then define a partial mapper class to generate the mapping:
using Facet;
[Mapper]public static partial class StudentMappings{    // The source generator will create the mapping methods here}
Facet will automatically generate:
// Generated code (simplified)public static partial class StudentMappings{ public static StudentDetailsDto ToStudentDetailsDto(this Student source) { return new StudentDetailsDto { Id = source.Id, Name = source.Name, Email = source.Email, Grades = source.Grades.Select(g => new GradeDto { Subject = g.Subject, Score = g.Score }).ToList() }; }}🧭 Using Facet in Your Code
Section titled “🧭 Using Facet in Your Code”Now, mapping in your controller becomes as simple as calling a method:
[HttpGet("{id}")]public async Task<ActionResult<StudentDetailsDto>> GetStudent(int id){    var student = await _context.Students        .Include(s => s.Grades)        .FirstOrDefaultAsync(s => s.Id == id);
    if (student == null)        return NotFound();
    return Ok(student.ToStudentDetailsDto());}
You can also generate reverse mappings by adding another attribute:
[MapFrom(typeof(CreateStudentDto))]public partial class Student { }This generates a mapping from CreateStudentDto to Student automatically:
var student = dto.ToStudent();🧠 Advantages of Using Facet
Section titled “🧠 Advantages of Using Facet”| AutoMapper | Facet |
|---|---|
| Reflection-based runtime mapping | Source-generated mapping at compile time |
| More “magic” behind the scenes | Fully visible, strongly typed generated code |
| Slight runtime overhead | Zero runtime overhead (no reflection) |
| Easier to set up for simple cases | More explicit configuration upfront |
| More widely used in legacy projects | Modern, performant choice for new projects |
Facet is especially attractive if:
- You want fast and predictable mappings,
- You prefer explicit over implicit behavior,
- You want to catch mapping errors at compile time rather than runtime.
⚠️ When to Choose Facet
Section titled “⚠️ When to Choose Facet”Use Facet when:
- Your DTO mappings are mostly straightforward,
- You want compile-time safety and better performance,
- You want to avoid the runtime complexity of AutoMapper.
Stick with manual mapping if:
- You need complex business logic during mapping,
- You prefer having full control inside your own code,
- You want to orchestrate additional steps (e.g., validation, database calls).
✅ Summary:
Facet sits nicely between AutoMapper and manual mapping:
- Faster and safer than AutoMapper,
- Less boilerplate than hand-written mapping,
- Easy to maintain in growing projects.
- Watch example video from Nick Chapsas on YouTube
Summary
Section titled “Summary”- DTOs give you full control over the shape of your API.
- Different endpoints should have different DTOs — you don’t need to expose your entities directly.
- You can map DTOs using:
- A mapping library like AutoMapper for convenience.
- Own mappers for explicit, maintainable, and testable mapping logic.
- Choosing between these approaches depends on your project complexity and team preferences.